Skill Level:
Crafting Time:
Technique(s):
Category:
Share This Craft
Search Crafts
Soy Candles

For a fraction of the price of store-bought candles, you can whip up a batch of lovely-smelling, professional-looking candles! These soy candles are very easy to make, and they are nice gifts to bestow on your guests as they leave your holiday party. Not only are these great party favors, but they also make excellent gifts for your co-workers, treats for your kids’ teachers, or even stocking stuffers!
One thing you need to know before you start is that this whole process takes several hours from start to finish, so it is best to wait until the weekend when you have more time on your hands. The most time-consuming steps (waiting for the wax to melt and cool down) are “hands-off,” so you can use that time to write holiday cards, decorate your Christmas tree, check out Santa’s dance moves, or just relax.
Getting Started:
We understand that when venturing into a new craft or skill, it not always feasible to buy a brand new set of tools or equipment. Therefore, we designed this craft to be made using tools that you already have at home (e.g., slow cooker, glass measuring cup, and a plastic mixing spoon). That being said, you may want to dedicate some tools solely to candle making, such as the baster.
For our candles, we used peppermint bark fragrance oil; it has a sweet scent of chocolate and mint. (We also really like blue spruce.) If you would prefer another scent, feel free to browse through more holiday scents here. When ordering and using fragrance oil, our general rule of thumb is 1 ounce fragrance oil per pound of soy wax. You can use less fragrance oil if you prefer a lighter scent, but if you prefer a stronger scent, you may want to purchase more oil. Happy candle making!
Supplies & Tools:

- Slow cooker, 6 quart capacity
- Slow cooker liners, such as these from Reynolds
- Golden Brands 464 soy wax, 10 lb bag
- ECO 10 6" pretabbed wicks
- Wick stickers (or a hot glue gun & glue sticks)
- 4 oz. of fragrance oil (We used peppermint bark.)
- 20-piece bag of dye chips in a color that corresponds with your selected scent (We used red dye chips to match our peppermint bark scent. You could use green with blue spruce scent or brown with gingerbread scent.)
- 12 glass jars
- 12 lids
- Kitchen scale
- Plastic mixing spoon
- Thermometer
- Glass liquid measuring cup
- Baster
- Washi tape
- Scissors
- Printable template for round “Handmade with Love” labels (download here)
- Printable template for oval labels (download here)
- Avery Round Labels 22807
- Avery Oval Labels 22820
Directions:
- Place a liner in your slow cooker.
- Weigh 5 lbs of wax flakes with your kitchen scale, then dump the flakes into the slow cooker, covering with the lid.
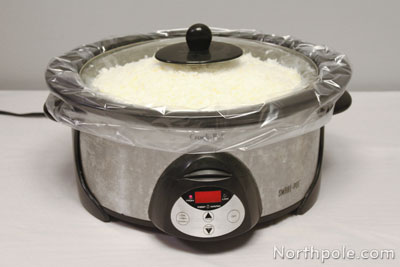
- Turn slow cooker on high heat and allow wax to melt completely. This will take about 2 hours.
- While you wait for the wax to melt, prep the jars and the wicks.
- If needed, straighten the wicks by running them between your thumb and forefinger.
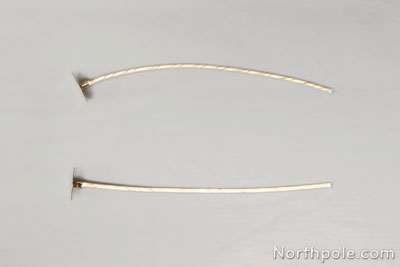
- Add a wick sticker or a dab of hot glue to the bottom of the metal tab on the wick, then insert it inside the jar, pressing it down in the center.
Note: A chopstick or butter knife is helpful in pressing the wick down.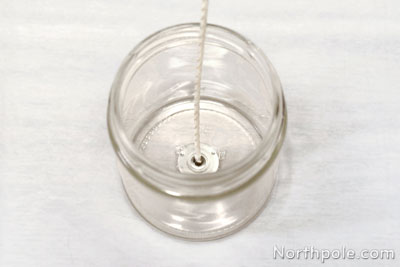
- Repeat for each jar.
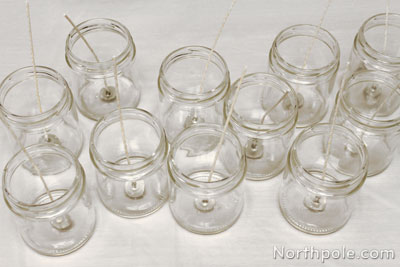
- If needed, straighten the wicks by running them between your thumb and forefinger.
- Once the wax melts and has reached 185°F, add 10 dye chips and stir until completely dissolved.
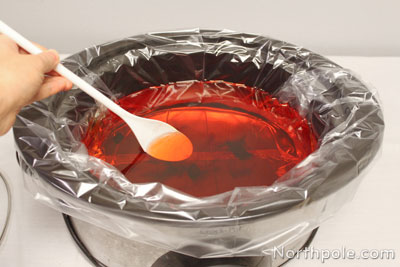
- Add the fragrance oil and stir.
- Allow the wax to cool to 135°F. This will take a couple of hours, so sit back and relax or use this time to plan other party details!
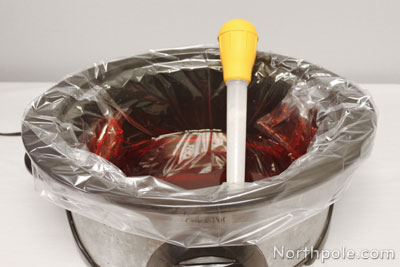
- After the wax has reached 135° F, pour wax into jars using measuring cup.
Note: Do NOT scrape the measuring cup along the bottom or sides of the pot, as you don’t want to poke a hole in the plastic liner. - As you continue transferring wax from the slow cooker to the jars, tilt the pot to make it easier to fill the measuring cup with wax. When there’s not enough wax to fill the measuring cup, switch to the baster to transfer the remaining wax to the jars.
- At this point, you may notice that the tops of the wicks are too close to the sides of the jars—we want the wicks to be centered within the jars. There are a few ways to center the wick, but here’s our method: stick a piece of washi tape across the top of a jar, then cut a little incision for the wick to rest in. Repeat for all jars. Now all your wicks are centered and standing tall!
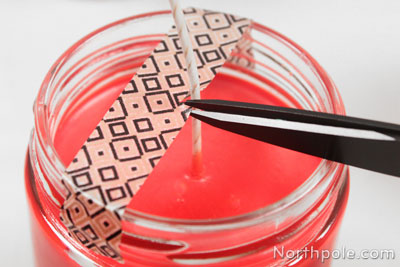
Note: Our mistake!! We photographed this after the wax cooled, but you need to do this step while your wax is still liquid! - Set candles aside to cool, placing them at least 4" apart so that they cool evenly.
- After the candles have cooled, trim the wicks down to 0.5".
- Download the “Handmade with Love” labels template and print on Avery Round Labels 22807. Set labels aside.
Note: Print the labels at actual size (100%). The labels will not print correctly if the “fit” option is selected! - Download and open the oval labels template.
Note: For best results, open, edit, and print this template with Adobe Reader. If you print from your web browser, the text will be too small and off-center.- Select text inside one oval and type the scent of your candles, a holiday message, or whatever you like. Our labels say “Peppermint Bark Soy Candle.”
- Hit the “tab” key, then the text will automagically change in all the ovals.
- Print on Avery Oval Labels 22820 sheets.
Note: Print the labels at actual size (100%). The labels will not print correctly if the “fit” option is selected!
- Place a round label on each lid and an oval label on the front of each jar.
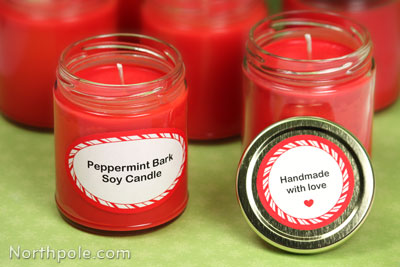
Alternatively, you can decorate the jars with washi tape, ribbon, or other festive embellishments. Click here for ideas. - Now you’re all done and have 12 lovely candles to give as gifts!

Elfy Hints:
- If the wax levels are uneven from candle to candle OR if one of the jars isn’t completely full, use the baster to transfer some wax from one jar to another to even things out.
Note: This trick only works while the wax is in its liquid state. - If you get bubbles on the surface of your candles or craters in the center of your candles, this could be caused by the temperature of your wax dropping too rapidly. Use a heat gun to melt the surface of your candles. Any bubbles will “pop,” and the hot wax will fill in any craters. (Craters can be a bit more persistent than bubbles, so you may need to repeat this trick a couple times to get a smooth surface.) After the wax hardens, it should now be nice and smooth.
- This craft definitely requires some clean up. Here are some tips on cleaning your tools:
- Measuring Cup: Scape out as much wax as you can, then place measuring cup upside-down on a paper plate covered with paper towels and microwave for 2 minutes to melt the wax. The excess wax will drip onto the paper towels. Wipe out any remaining wax with clean paper towels. Repeat, if needed. Wash measuring cup with hot, soapy water.
- Mixing Spoon: Use the same process you used for cleaning your measuring cup.
- Baster: Remove rubber bulb from the shaft. Lay the shaft on a paper plate covered with paper towels and microwave for 2 minutes. Remove from microwave and allow wax to drip out. To get remaining wax out, insert a paper towel inside the shaft. Note that there will still be some residual wax in the baster, therefore, we do not recommend using this baster with food. Store the baster with your candle making supplies for the next time you make candles.
- Thermometer: Wipe immediately after using.